
Quick Fixes for Cracked Grout on Bathroom Tile Floors
A hairline crack in grout can feel like a tiny problem, until it turns into a dark line that grabs your eye every morning. Even worse, cracked grout can let water sneak where it doesn’t belong, under tile and into the floor system.
If you want to fix cracked grout fast, the goal is simple: remove anything loose, bond new grout well, then protect it so the crack doesn’t return next month. Below are practical, bathroom-friendly repairs that work for most tile floors, plus the red flags that mean it’s time to bring in a pro.
Why bathroom floor grout cracks (and why it matters)
Grout is the filler between tiles, not glue. It’s tough, but it isn’t flexible. Bathrooms add moisture, temperature swings, and daily foot traffic, which is a lot to ask from a thin strip of cement-based material.
Common reasons grout cracks on bathroom tile floors:
- Floor movement: A little bounce in the subfloor can crack grout like a snapped cookie.
- Poor grout bond: Dust, soap film, or old sealer can keep new grout from gripping.
- Shrinkage and thin joints: Grout that dries too fast or was mixed too wet can shrink.
- Wrong material at changes of plane: Corners and transitions should often be caulked, not grouted.
Cracked grout isn’t always an emergency, but it’s a reliable “check engine” light. If water keeps reaching the setting bed or subfloor, tiles can loosen, and repairs get bigger and pricier.
Three quick checks before you start any grout repair
You’ll get a better result if you spend two minutes diagnosing the crack.
1) Is the grout missing, crumbling, or just hairline cracked?
Hairline cracks can sometimes be patched, but crumbly grout usually needs removal and replacement in that area.
2) Do any tiles move or sound hollow?
Tap tiles with a knuckle. A hollow sound or slight movement points to a tile bond issue, not just grout. In that case, regrouting alone is like painting over a leak stain.
3) Is the area staying damp?
If the floor around a toilet, tub, or shower stays wet, solve the moisture source first. The EPA’s overview of mold basics is a helpful reminder of why trapped moisture matters: https://www.epa.gov/mold/mold-course-chapter-1
Quick decision guide
| What you see | Likely cause | Best “quick fix” |
|---|---|---|
| Thin crack, grout still hard | Minor shrinkage or age | Spot repair and seal |
| Cracks at corners or where tile meets tub | Normal movement | Replace grout with flexible caulk |
| Repeated cracking in same spot | Subfloor flex or loose tile | Professional assessment, possible reset |
The fastest way to fix cracked grout (spot repair that holds)
A good spot repair is more than smearing new grout over the crack. The new material needs depth and clean edges to grab.
Step 1: Clean and dry the joint
Bathroom grout collects soap residue and body oils, and grout won’t bond to that.
Use warm water and a pH-neutral cleaner, scrub with a nylon brush, rinse well, then let the area dry fully. If the bathroom is humid, run the fan and give it extra time. A hair dryer on low can help, but don’t overheat the tile.
Step 2: Remove anything loose (this is where the repair succeeds or fails)
Use a grout saw or a carbide-tipped removal tool. Your goal is to remove cracked or hollow grout until you reach solid material.
A practical target is to remove at least 1/8 inch deep when possible. Vacuum dust from the joints as you go, then wipe once more with clean water and let it dry.
Tip: Protect the tile edges. Think of grout removal like carving between two panes of glass, slow pressure beats speed.
Step 3: Mix and pack in new grout
Match the grout type you already have when you can.
- Sanded grout is common for wider joints (often 1/8 inch or more).
- Unsanded grout is used for narrow joints.
- Premixed “ready-to-use” grout can be convenient for tiny repairs, but it’s not always the best match for older cement grout.
Mix to a peanut-butter consistency, then press grout into the joint with a rubber float. Push from multiple angles so you don’t leave air pockets.
Step 4: Tool it smooth, then clean the tile face
After packing the joint, run the float across the tile on a diagonal to shape the grout and remove excess.
Wait a short time (follow the bag instructions), then wipe with a damp sponge. Rinse the sponge often. You’re aiming to remove haze without pulling grout back out of the joint.
Step 5: Let it cure, then keep it dry
Most grout needs time. If you rush showers or heavy mopping, the repair can weaken before it gains strength.
Plan for:
- No water exposure during the early cure period (check the grout label).
- Gentle use, no harsh cleaners for several days.
When grout shouldn’t be grout: corners and transitions
Many bathroom grout “cracks” are actually in spots that should never have been grouted.
At corners, along the tub edge, or where the tile floor meets a wall or threshold, the surfaces expand and shift at different rates. Grout can’t flex, so it cracks.
The fix: remove the cracked grout line in that transition and replace it with a mildew-resistant silicone or siliconized caulk that matches your grout color. Your repair looks cleaner and lasts longer because it can move without breaking.
Seal the repair so it stays clean longer
Sealer won’t stop structural movement, but it helps in two important ways:
- Reduces water absorption, which lowers staining and slows down grime buildup.
- Makes routine cleaning easier, so you scrub less and wear the grout less.
Once the grout has cured, apply a penetrating sealer to the grout lines only, then wipe off excess from the tile. Reapply on a schedule that fits your bathroom’s use and the sealer label.
When cracked grout keeps coming back (time for a pro)
If you’ve tried to fix cracked grout twice and the same line reappears, treat it like a symptom, not a surface flaw. Repeat cracking often points to subfloor deflection, loose tile, water issues, or failing grout throughout the floor.
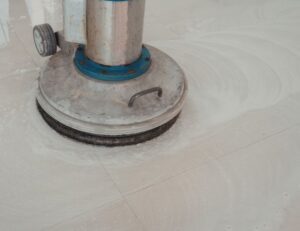
This is where professional stone and tile care pays off. Stone Medics brings over 40 years of expertise to stone and tile cleaning, sealing, polishing, and restoration, and that experience matters when the “real” problem is under the tile.
Helpful next steps if you’re in Northeast Ohio:
- Learn more about the team and approach here: Learn about Stone Medics’ grout repair expertise
- See what local clients say: Customer reviews of grout repair work
- Check coverage near you: service areas for grout repair and tile restoration
- Ready for an estimate or advice on the right repair? Contact Stone Medics for grout repair
Conclusion
Cracked grout on a bathroom tile floor is common, but it’s not something to ignore. Clean the joint, remove loose material, pack in new grout with care, and seal after curing to get a repair that blends in. Use flexible caulk at corners and transitions, because grout can’t handle movement there. If cracks keep returning, a deeper look can save you from loose tile and water damage, and the right plan will fix cracked grout for the long run.